

Monday, 15 November 2010
A Time To Remember - Daring Cardmakers
Here is my card for the Daring Cardmakers Time to Remember card challenge in honour of the service men and women who have given their lives for our freedom. May we always remember them and the sacrifices they made.

Christmas Gift Ideas - Part 1
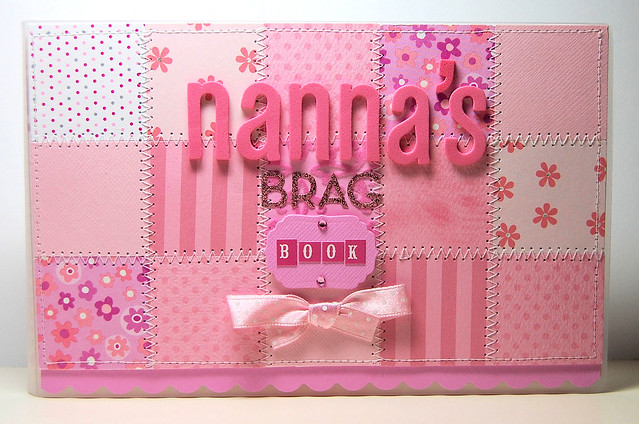
I'm hoping to post a small series of ideas on quick and easy christmas gifts. My first idea is creating small 'Brag Books' easy enough for any proud parent, grandparent or auntie to carry around in their handbag.
 Supplies needed:
Wood ware Blue 2" Craft Punch
Paperchase Clear 4x6 slip in Photo Album
Paper Scraps
Letter stickers
Ribbon
1. Punch 15 squares from co-ordinating paper, this is a great way to use up some of those scraps.
2. Mount the 15 squares on a sheet of card, use a small dab of pritt stick to attach so the glue does not gunk up the needle when sewing.
3. Sew a running stitch around the edge, pull the end of the thread through and tie underneath.
4. Using a zigzag stitch sew across the edges of the squares to create the patchwork effect, pull the end of the thread through the last hole and tie underneath.
4. Trim off the excess card and adhere to the front of the album.
5. Decorate the front with letter stickers, ribbon and any embellishments that you like
Finished! This little project takes about 30 mins, and is simple even for those challenged by a sewing machine (I count myself as one of those people!) I have taken the additional step of placing some paper on the inside cover and adding a MME Daily Dose journalling card;
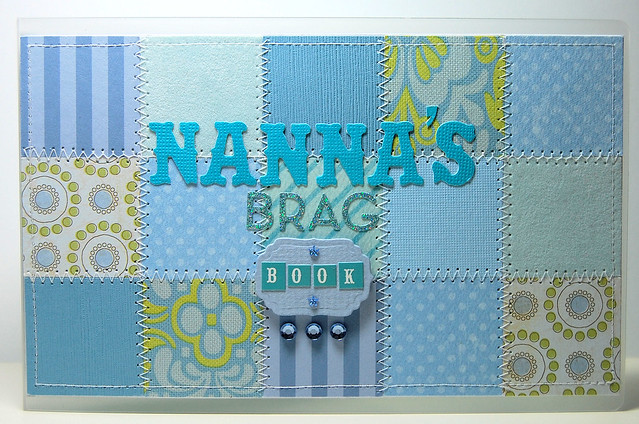
 so the proud receipient can have all the important details close to hand! Here is one I have made in blue.
 Apart from the cost of the album (£1.50) you should have most of the products on hand, so this is a nice, cheap but reasonably expensive looking gift! If you make one I would love to see it!
Back soon x
Wood ware Blue 2" Craft Punch
Paperchase Clear 4x6 slip in Photo Album
Paper Scraps
Letter stickers
Ribbon
1. Punch 15 squares from co-ordinating paper, this is a great way to use up some of those scraps.
2. Mount the 15 squares on a sheet of card, use a small dab of pritt stick to attach so the glue does not gunk up the needle when sewing.
3. Sew a running stitch around the edge, pull the end of the thread through and tie underneath.
4. Using a zigzag stitch sew across the edges of the squares to create the patchwork effect, pull the end of the thread through the last hole and tie underneath.
4. Trim off the excess card and adhere to the front of the album.
5. Decorate the front with letter stickers, ribbon and any embellishments that you like
Finished! This little project takes about 30 mins, and is simple even for those challenged by a sewing machine (I count myself as one of those people!) I have taken the additional step of placing some paper on the inside cover and adding a MME Daily Dose journalling card;
Back soon x
Sunday, 14 November 2010
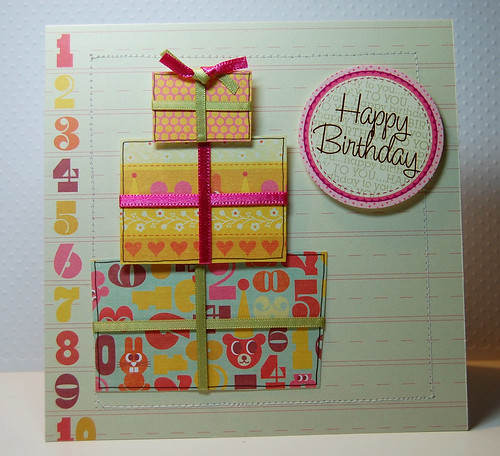
Birthday Sprinkles!
After a little holiday break I am back again with November's Crafty Templates card kit 'Sprinkles', filled with sugar sweet papers and cardstock, tickets, tags and some scrumptious ribbon. I used the fun stacked cakes template for the first card
 The cakes look so adorable at a jaunty angle, I think this is one of my favourite templates! The second card features the stack of gifts template and can be used for so many different occasions, change up the papers and you have got a great card for those difficult men's cards :)
 I know I sound like a stuck record but I really cannot say enough good things about Leo's kits. The Quirky kits are perfect for scrapbooking and have such cute little touches, the Card Making kits are a joy to work with and the Crafty Bales kits sell like hotcakes, so much so that I missed out on getting one they sell so fast, they are filled with paper crafting goodies and can contain components for mini books, fabric and much more.
Take a look at fellow DT Kathy's blog to see what she has done with this month's kit!
Hope to be back later in the week with a little gift box tutorial (it's new to me but may be old to you but they will be great for xmas!)

Take a look at fellow DT Kathy's blog to see what she has done with this month's kit!
Hope to be back later in the week with a little gift box tutorial (it's new to me but may be old to you but they will be great for xmas!)
Saturday, 13 November 2010
Bits and Pieces
I'm busy beavering away making christmas gifts and various other bits and pieces. Using an idea I saw in an issue of CK I decided to create a chart for my distress inks so I can see at a glance what colours I have because looking at the ink pad itself isn't a good indicator!
 It's pretty and functional!
I was fortunate enough that Mr Paper agreed to take me to the NEC last week. I was a little disappointed as it wasn't as large as I thought it would be and it was definately more crowded so I didn't come home with as many bits and pieces as I would like but I made up for it by ordering a few things on line. This is what I came away with..

 I have been itching to get some of these for ages and was pleased to find them for £2.50 a pack from here.
 Some bargain basic grey pads and embellishments from here.
 Some cute fabric cones from Ikea and little christmas wood shapes from Tesco which are destined to be used as card toppers or on scrapbook pages.
 And I finally succumbed and bought the Tattered Florals die!
At the NEC I declared to Mr Paper that I was going to make my own christmas cards. He reminded me that the last time I did this I said to him to tell me that I was not to do it again and I was crazy if I considered it. 'Ha' was my response, 'it will be better this time, this time I have a plan' to which he rolled his eyes and said 'just don't expect any sympathy when you get frustrated with it', I was confident that this time would be different.
Take some silver glitter paper, one reindeer die and....
 Argh, WTH was I thinking, this is how many reindeers I managed before I wanted to sit rocking in a corner quietly weeping. Mr Paper was sympathetic and compromised that I would make snazzy christmas cards for the family and I would buy a box of generic cards to send to everyone else, thank goodness!
If I say next year that I will make my own cards, tie my hands together, lock my craft room and remind me to re-read this post. I am in awe of you if you make all your own christmas cards!

I was fortunate enough that Mr Paper agreed to take me to the NEC last week. I was a little disappointed as it wasn't as large as I thought it would be and it was definately more crowded so I didn't come home with as many bits and pieces as I would like but I made up for it by ordering a few things on line. This is what I came away with..

I was pleased to add some more distress inks to my collection and grabbed some lovely little 4x4 cards for my christmas cards along with the reindeer flight die, but more on that later. These are the other goodies I bought on line..


At the NEC I declared to Mr Paper that I was going to make my own christmas cards. He reminded me that the last time I did this I said to him to tell me that I was not to do it again and I was crazy if I considered it. 'Ha' was my response, 'it will be better this time, this time I have a plan' to which he rolled his eyes and said 'just don't expect any sympathy when you get frustrated with it', I was confident that this time would be different.
Take some silver glitter paper, one reindeer die and....

If I say next year that I will make my own cards, tie my hands together, lock my craft room and remind me to re-read this post. I am in awe of you if you make all your own christmas cards!
Friday, 5 November 2010
Just a quickie
I know I have been a little quite recently, scrapbooking seems to have sucked up a lot of my time! I have a new Crafty Templates kit to work with this week so I hope to be back to a more regular posting schedule shortly!

Monday, 20 September 2010
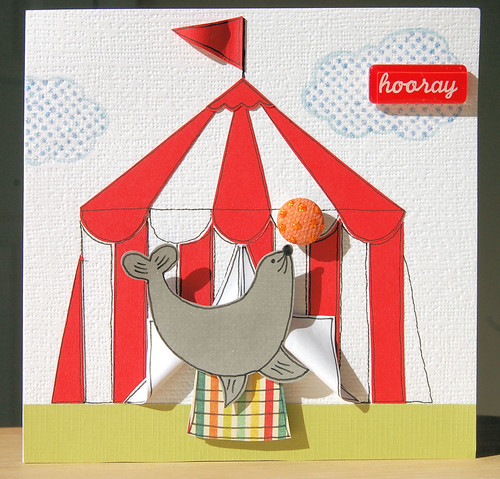
Crafty Templates Circus
Roll up, roll up, the circus is in town! I have had lots of fun working with the September Crafty Templates Card Making Kit and Templates called Circus. As I have said previously Leo has such a great eye when it comes to putting kits together and this month's certainly did not disappoint. Filled with lots of My Minds Eye yumminess with some Cosmo Cricket thrown in for good measure.
The templates are fab for children's birthday cards or for making your own miniature toppers to have handy for decorating cards or embellishing your scrapbook page. If you haven't tried one of Leo's kits, I urge you to do so, they are such great value and filled with quality supplies and ideas!
Here is my personal favourite, the sea lion!
 I used the sealion coupled with the big top template, it was so much fun to put together. I added some American Crafts stamped clouds and an acrylic sentiment tile.
 Here he is juggling some brad 'balls'. I love, love, love the Cosmo Cricket tiny type alphas!
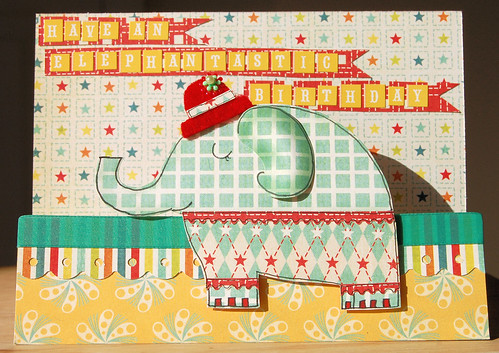
 Mrs Nellie Phant is just adorable in her little felt hat set at a jaunty angle! Finally there is Mr Robot
 I added the tag, Cosmo Cricket cogs rub ons and some Heidi Swapp chipboard lettering, perfect for that special little boy's birthday.
I don't know where the time keeps going, yet another busy couple of weeks where I have done much less crafting than I would like. I am going off to the land of the mouse this week and hope to pick up lots of crafty goodies and come back feeling all inspired.
Have a great couple of weeks and see you when I get back!
The templates are fab for children's birthday cards or for making your own miniature toppers to have handy for decorating cards or embellishing your scrapbook page. If you haven't tried one of Leo's kits, I urge you to do so, they are such great value and filled with quality supplies and ideas!
Here is my personal favourite, the sea lion!


I don't know where the time keeps going, yet another busy couple of weeks where I have done much less crafting than I would like. I am going off to the land of the mouse this week and hope to pick up lots of crafty goodies and come back feeling all inspired.
Have a great couple of weeks and see you when I get back!
Saturday, 11 September 2010
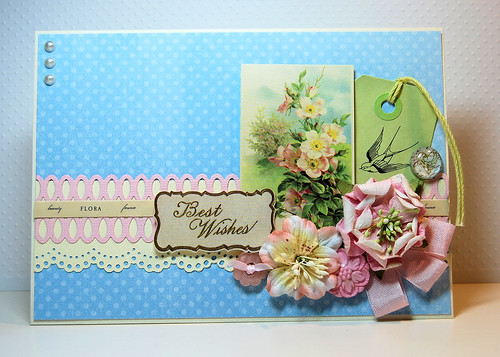
Two cards for two Mama's
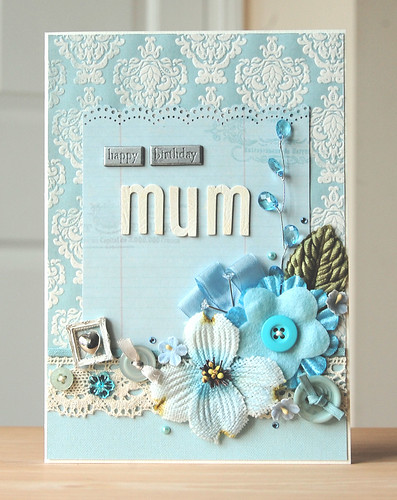
I have so many birthdays in September, 6 at the last count! My beautiful mama's is on the 6th and Mr Paper's Mama is on the 18th so I was tasked with making two very special cards.
I tend to keep lapsing back into the same style, shabby chic but with a cleaner edge, I love it so much and I think they look so pretty that I can't help myself, it's like falling into a comfortable armchair. I need to start making things outside my comfort zone otherwise I will get stuck in a rut and that's not good!
Here is the card I made for my mum

I had to walk away from it because I just kept adding more embellishments and I think I nearly 'over egged the pudding' Supplies used: Paper; Making Memories, Flowers; Making Memories, Prima, Imaginisce, Lace; Crafty Templates, Frame; Melissa Frances, Letters; American Crafts.
This is card number two
 Supplies used: Paper; MME, Sticker; Stampendous, Flowers; Prima, Lace; Crafty Templates, Badge and Letters; American Crafts.
I love them both although the blue one just edges it for me, I love flocked paper, especially when it is damask!
Happy days :)
I tend to keep lapsing back into the same style, shabby chic but with a cleaner edge, I love it so much and I think they look so pretty that I can't help myself, it's like falling into a comfortable armchair. I need to start making things outside my comfort zone otherwise I will get stuck in a rut and that's not good!
Here is the card I made for my mum
I had to walk away from it because I just kept adding more embellishments and I think I nearly 'over egged the pudding' Supplies used: Paper; Making Memories, Flowers; Making Memories, Prima, Imaginisce, Lace; Crafty Templates, Frame; Melissa Frances, Letters; American Crafts.
This is card number two

I love them both although the blue one just edges it for me, I love flocked paper, especially when it is damask!
Happy days :)
Friday, 10 September 2010
Better late than never!
Ever feel like there are not enough hours in the day? Yup, same here, I've got quite a few cards that I have made that I haven't got around to sharing so I'll be posting a few over the next couple of weeks :)
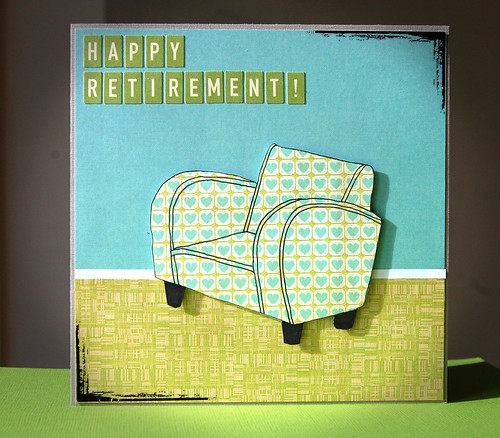
Here are last month's Crafty Templates using the 'Chilled Out' card kit which includes a summery mix of yummy Sassafrass Lass papers. Go here to get yours before they sell out!
 This is my favourite, I adore Mary Janes and it makes it even cuter that my husband thought of the sentiment!
 I like the simplicity of this one, sit back, relax and enjoy your retirement. Oh how I'd love to be retired, sitting crafting all day, bliss!
Well, that's it for now, be back later with some more x
Here are last month's Crafty Templates using the 'Chilled Out' card kit which includes a summery mix of yummy Sassafrass Lass papers. Go here to get yours before they sell out!

Well, that's it for now, be back later with some more x
Wednesday, 28 July 2010
WOYWW - 28/07/2010
Hello WOYWW-ers, hope you are all doing ok, I've missed the past couple of weeks as things have been a bit hectic! No workdesk today as I forgot to take a picture (what a doofus!) instead I have a picture of my home made clip it up.

I had been bugging Mr Paper for a couple of years about buying me a clip it up and the silly, silly man, instead of parting with the cash said "why buy when I can make you one", of course I bugged him for weeks and weeks to make it and it never materialised, eventually I was resigned to the fact that I would never get one and would have to continue raking through a large cardboard box to find my supplies.
One day, many months later, he came home from work and placed a large object wrapped in a bin bag on the table with a heavy 'thunk', imagine my delight when I saw what he had made! I am lucky that he works in a manufacturing plant where he has access to lots of tools, metal, paint and such like. The only change I made was to spray it white. I bought lots of clips and hooks from Ikea and now have my very own rotating, albeit and bit heavy, clip it up!
So, here is the card I made today on the workdesk I forgot to photograph!
If you haven't seen it yet, have a little look at the post below which has a tutorial on how to make a rolled spiral flower wreath.
Have a great week!
Monday, 19 July 2010
Use Those Scraps! Blossoms and Butterflies

I have entered the weekly challenge on the Fiskarettes blog entitled 'Blossoms and Butterflies', as soon as I heard the theme I knew what I wanted to make and this is a great way to use up those scraps.
I am terrible, I keep the tiniest scrap of paper and in all honesty I don't know how I would use it but I just can't bear to throw things away, it's the pack rat in me!
For this project you need:
Thick chipboard, twine, paper scraps of all sizes, hot glue gun, butterflies. I also used a quilling tool which is optional as you can just use your fingers but I find it makes the task a little easier and helps make tighter flowers.

Cut a ring out of thick chipboard, you can use a plate as a template if you wish, I used a compass.

Tie the twine in a knot to secure then glue a portion of the ring and start wrapping twine around to cover the ring, this is a nice job to do whilst sitting in the car or watching TV. I used a glue tape runner to secure my twine. When you get to the back tuck the twine underneath the last loop and tie in a knot.

Using a fiskars shape cutter, fingertip knife or scissors cut circles out of paper in varying sizes, I did not have a set size of circle, I just cut them as big as the scrap I was using would allow.

Take your circle and cut into a spiral. You can also use paper edger scissors to get a pretty fluted or raggy effect.

You can use your fingers to curl the paper into a spiral, I like to use a quilling tool as it allows me to get a tighter coil in the centre. Once coiled you can then loosen the flower to get the look you want to achieve. I then add a dab of glue to secure it in place.

Make as many as you think you need, be sure to make some smaller ones to fit into the little gaps. You can use any colour theme you like, as I was aiming to use up some scraps I went for a rainbow affair!

Using a hot glue gun, glue the flowers to the ring, the twine allows better adhesion. I started by gluing the larger flowers down then filled in the gaps using the smaller flowers. I did need to make an additional 10-15 flowers from what I had originally made to fill the gaps.

Using a hot glue gun, glue a length of ribbon on the back to allow you to hang the wreath up. I then coloured in some digital Hero Arts butterflies from the Winged Friends digi kit with promarkers, added stickles and covered with glossy accents. When dry I cut them out and mounted them on a thin strip of acetate which I had creased into a Z shape and glued to the wreath, it allows a little bit of movement so the butterflies look like they are hovering over the flowers.
I had so much fun making this and it only took a few hours to do and you end up with a pretty piece of home decor! I hope you like and are having a wonderful week!
Saturday, 17 July 2010
Island Bliss - July Crafty Templates
Well, it's been a while :) I have been so busy just lately and I hate the fact that I have neglected my blog a little, I hope to make up for it in the next few days!
Here are some cards made with the Crafty Templates July card making kit Island Bliss along with this months templates. Leo really knows how to put together a fabulous kit, gorgeous papers and lovely embellishments. She also makes Crafty Bales mini kits which sell out quickly, I encourage you to visit her shop and have a browse!
My favourite this month is the guitar, perfect for a music loving teenager or for a more hippy chick vibe
 I added some music paper, polka dot paper from last month's kit and thread to make the guitar strings.


Here are some cards made with the Crafty Templates July card making kit Island Bliss along with this months templates. Leo really knows how to put together a fabulous kit, gorgeous papers and lovely embellishments. She also makes Crafty Bales mini kits which sell out quickly, I encourage you to visit her shop and have a browse!
My favourite this month is the guitar, perfect for a music loving teenager or for a more hippy chick vibe

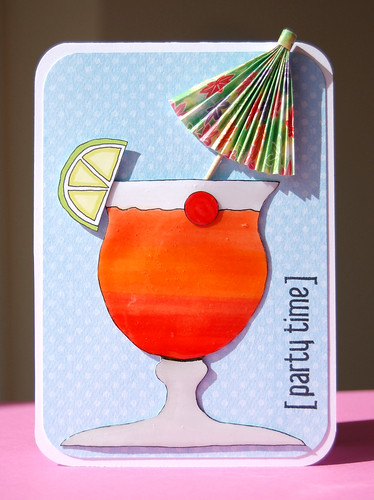
This fun cocktail glass coloured with promarkers and glossy accents. The umbrella is made by folding paper accordian style, glue a strip around the top then fluff out and add a cocktail stick.

This one is using the versatile tropical flowers template
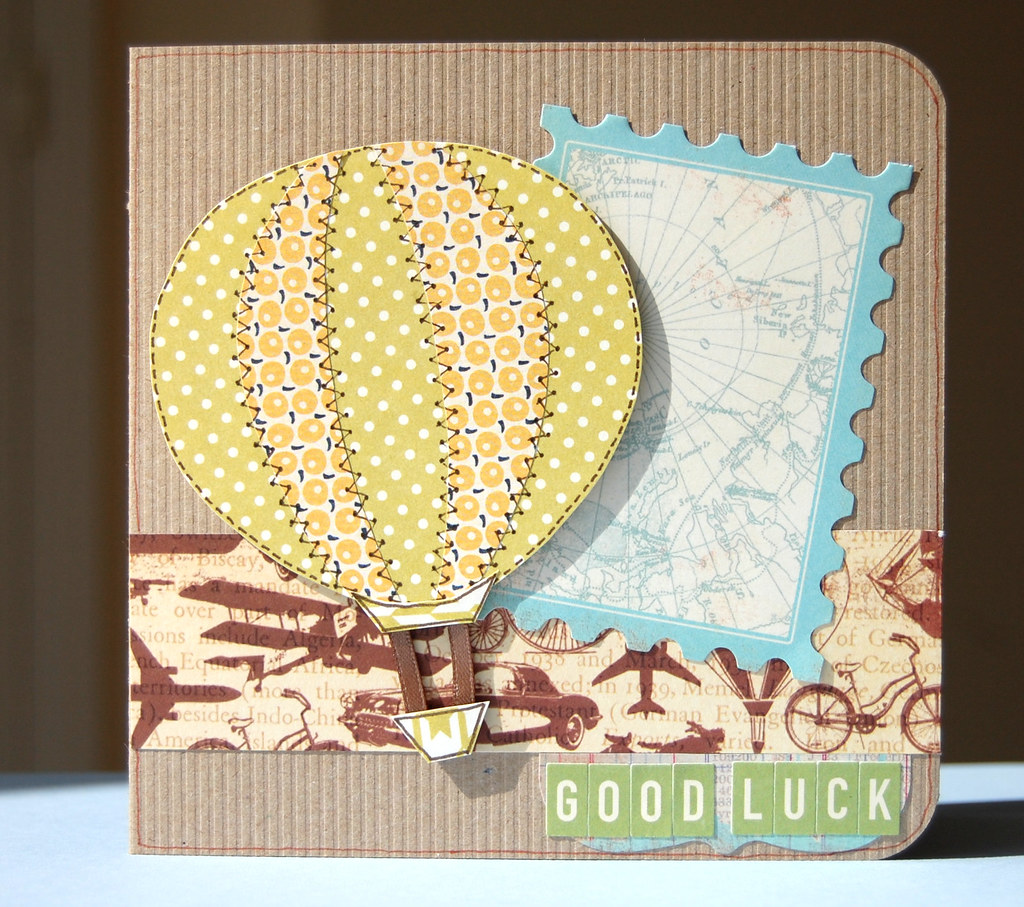
and finally using the hot air balloon template, I had fun adding on faux stitching to create a patchwork effect.
That's all from me for now, be back soon with more creations to share!
Sunday, 27 June 2010
Fiskarettes Card W/C 21/06/10
Just a quick one! I thought I would share my latest card for the Fiskarettes blog :) Full instructions are here.

If you haven't visited before why don't you pop over for some ideas, inspiration and to join in with the Monday challenge!

Wednesday, 23 June 2010
WOYWW - 23/06/10

I then had the braniac idea to make double images and layer them to add a bit of dimension, cutting out 4 sets of gerberas were a little taxing, the rounder flowers slightly easier, but I also decided to use glossy accents on them. A job I anticipated would take about a day (I can be a very slow cardmaker) took about 3 days stretched out between running errands and going to work and setting up a summer tea party seen two blog posts down.

I am pleased with the final result, I promise they look better in person, I had to take them in the evening and I still haven't learnt how to correct the colours in my photo program so they look a bit better! I hope you like them!
If you are new and wondering what WOYWW is all about, hop over to the lovely Julia Dunnit's Blog Stamping Ground to join in the fun!
Have a wonderful week and thank you so much for the kind comments you leave :)
Monday, 21 June 2010
Summer Fete June Card Kit - DT Crafty Templates
So many gorgeous templates this month and the cardmaking kit Summer Fete can only be described as yummy! Go to Crafty Templates to get yours!


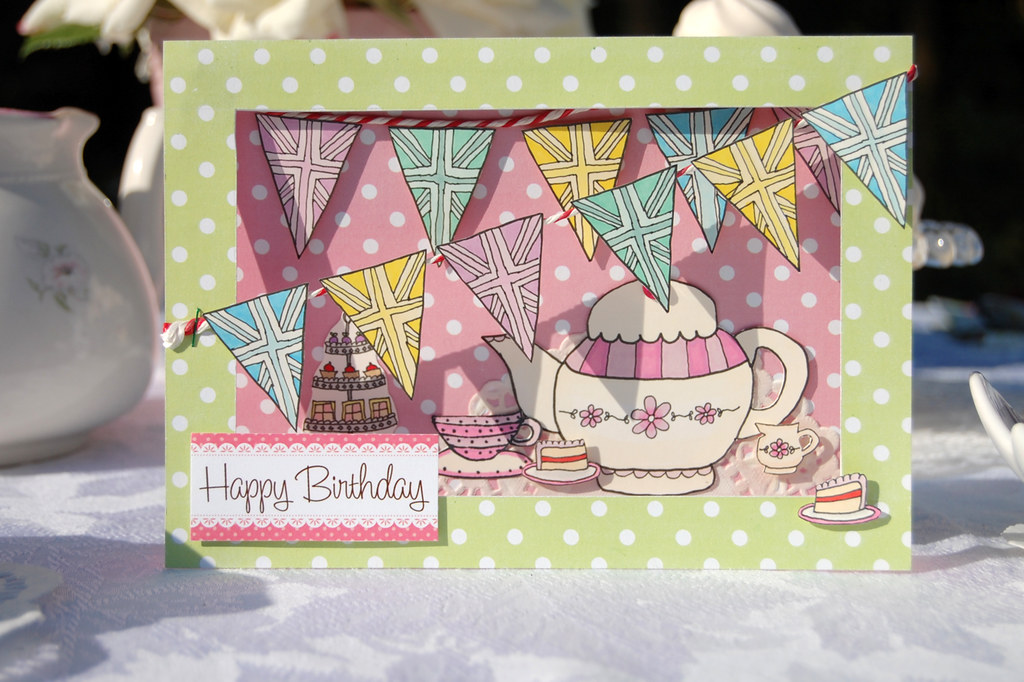
First up is my favourite - A British Tea Party using the union jack bunting and teapot templates. I added in the cake stand, cake slice and crockery. The pretty polka dot paper and twine were from the kit.
Next is Today's Your Day using the second bunting template with twine and sentiment label from the kit. I used extra bunting to decorate the envelope.

This one is also a favourite of mine. I used the bunting template, AC papers, little ladybug pegs from John Lewis and more of the lovely polka dot, twine and flowers from the kit.

This one Mr Paper declared was his favourite, Ice Cream Wishes. All papers and sentiment were from the kit, I used a sheet of the paper to weave the cone and also added a touch of glitter :)

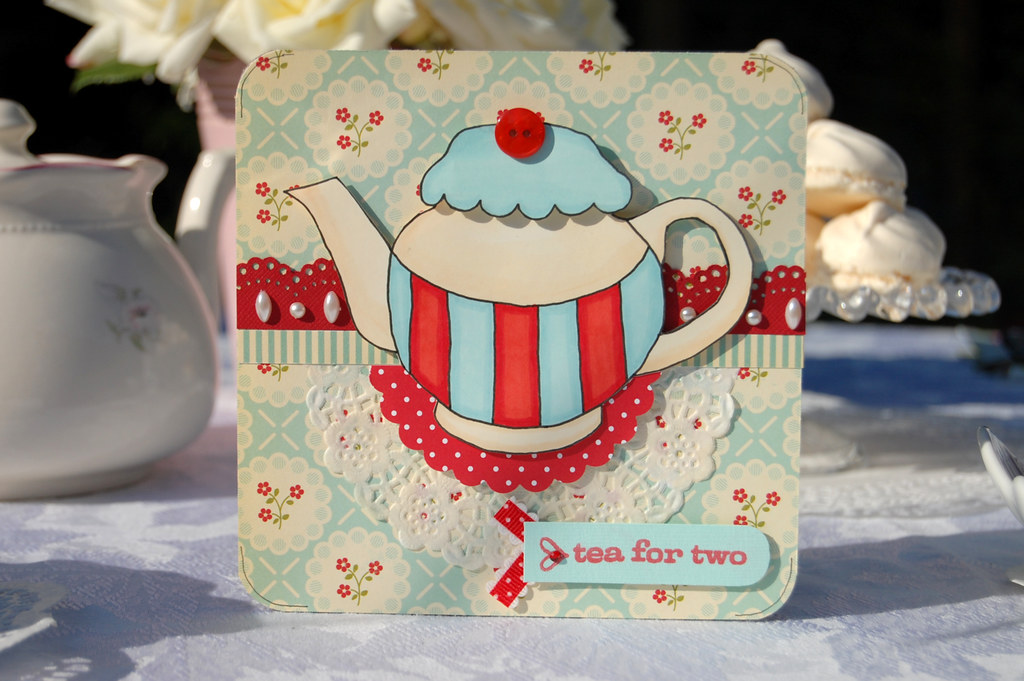
and lastly there is Tea for Two, using the prettiest paper I have seen in a while, doily and teapot template from the kit. I used promarkers to colour in the teapot and added a punched accent and pearls.
Leo really does put together some amazing kits. If you prefer Scrapbooking have you seen her Quirky Kits? Gorgeous papers and carefully considered accents, you'll have to act fast though as these sell out quickly!
Be back later this week, hope you all had a wonderful weekend!
Tea for Two
It's all about the bunting baby!
A few weeks ago I was thrilled to be included on dotcomgiftshop's list of 50 more superb craft blogs and this week I was even more thrilled to receive a package from them containing the pretty Vintage Paisley and stunning Paper Lace bunting. Gorgeous, sturdy and a whopping 8 metres long!
 Their store is filled with the most beautiful things for home and garden and I have already dropped heavy hints to my husband for our upcoming anniversary for the vintage wall mounted organiser or to search for anything green :)
Bunting is very popular at the moment and can be seen on everything from cards to cushions and it also holds a soft spot in my heart. Reminiscent of school fetes with thick, jammy slices of victoria sponge, pretty fairy cakes, airy butterfly buns, crowded bouncy castles, throwing bean bags at coconuts, balloons slightly wilted in the midday sun, lips stained from drinking panda pop cherryade and sticky hands clutching pocket money wondering what to spend it on first.
Today, whilst the men spent Father's Day relaxing down by the river fishing with a picnic of doorstep ploughman's sandwiches and cold cider the ladies left behind decided to have a tea party in the garden.

It was just gorgeous, cucumber sandwiches, big, juicy fat strawberries with strawberry meringue drops and fresh cream, mini cream cakes, tea and lashings of bucks fizz! The sun was shining and the music accompaniment came in the form of the birds singing and the soft flapping of the bunting in the breeze. Definitely a lovely way to spend a summery afternoon.

A few weeks ago I was thrilled to be included on dotcomgiftshop's list of 50 more superb craft blogs and this week I was even more thrilled to receive a package from them containing the pretty Vintage Paisley and stunning Paper Lace bunting. Gorgeous, sturdy and a whopping 8 metres long!

Bunting is very popular at the moment and can be seen on everything from cards to cushions and it also holds a soft spot in my heart. Reminiscent of school fetes with thick, jammy slices of victoria sponge, pretty fairy cakes, airy butterfly buns, crowded bouncy castles, throwing bean bags at coconuts, balloons slightly wilted in the midday sun, lips stained from drinking panda pop cherryade and sticky hands clutching pocket money wondering what to spend it on first.
Today, whilst the men spent Father's Day relaxing down by the river fishing with a picnic of doorstep ploughman's sandwiches and cold cider the ladies left behind decided to have a tea party in the garden.

It was just gorgeous, cucumber sandwiches, big, juicy fat strawberries with strawberry meringue drops and fresh cream, mini cream cakes, tea and lashings of bucks fizz! The sun was shining and the music accompaniment came in the form of the birds singing and the soft flapping of the bunting in the breeze. Definitely a lovely way to spend a summery afternoon.

Be back soon to share some creations from Crafty Templates, some of which have a bunting theme too!
Saturday, 19 June 2010
Fiskarettes DT Card June
Here's my first card as a Fiskarette, I thought it turned out really cute, apart from the slightly wonky pricked holes! Why don't you come over and join in the fun!

Wednesday, 16 June 2010
WOYWW 16/06/10 - Buttons!
Good morning WOYWW-ers. Most people can attest that I am very anal retentive when it comes to tidiness, hence why my workdesk always looks like organised mess, which in a way it is. I admire people that can work in, how do i put it delicately, creative chaos! I look at lots of WOYWW bloggers and see their desks and I am envious, I wish I could craft that way, it seems so much more freeing and, well creative than mine and I wonder if my neatness hampers my creativity.

What seems to be a clever idea at the time, in hindsight can prove to be an unwise decision. I had lots of little jars with all my buttons separated by colour, except it was such a pain dragging them out of my storage unit I didn't use them very much so I decided on a whim to empty them all into a kilner jar. I could not believe how many buttons I had, although I have now discovered I am woefully short on purple buttons which I guess gives me a good reason to go stash shopping!
It did cross my mind briefly that when I next wanted to make a project that required a specifc colour it would be a pain in the posterior to find the right one, this was also backed up by Mr Paper, who, when I proudly showed him my new jar, said 'good luck with that, I know you and you'll wish you hadn't done that'. Meh, was my response to this and I sat there all superior thinking it would inspire me to use them more and it was so pretty to look at and didn't think it would be that much of a problem, until today.
I am joining in with the Monday challenge on the Fiskarettes blog and I decided I needed buttons for the centre of some stars I was decorating, I sifted through the jar and each time came up with a button either too big or not the right shade. 'Damn, it would be so much easier if these were separated by colour' but alas, I had already had that bright idea and thought I knew better! I promptly dumped 2/3 of the jar on the table and sat for a good 15 minutes picking through them to find the right ones. Next time I have a clever idea like that somebody stop me!
Here's the card

If you have stuck with me till the end, thank you, I didn't know I had so much to write about buttons! Have a great week :)
Subscribe to:
Comments (Atom)
LinkWithin
