Friday 28 October 2011

Holiday Lists Notebooks

After having a wander through various blogs I saw some adorable notebooks on Michelle Wooderson's blog and had to make my own!

Mish has good instructions on her blog so I won't give you all the details here. I used Papertrey Ink's Friendship Jar and Holiday Fillers on the cover along with some yummy Basic Grey Nordic Holiday paper and some Waltzing Mouse Stamps Seasonal Remedies on the tag and inside the cover.

I can't wait to give these to family and friends in the next few days! They are super easy to make and look so pretty, I am looking forward to creating different non-holiday versions!


Wednesday 26 October 2011

A Cute Christmas Gift

I am not usually an organised christmas crafter, I tend to start things at the beginning of December and find myself frantically trying to finish various projects just a couple of days before christmas! This year I have decided to try and start things a little earlier.

I love anything sewing related and seem to have amassed a number of various supplies that I need to put to good use instead of admiring and putting back in the drawer. It all started with a set of small glass jars with cork tops that I bought on sale from Habitat. I had no idea what I was going to do with but an idea slowly morphed after looking at various bits and bobs on the net and via pinterest.

Without further ado, i give you...
{the project with no name} I'm not sure what to call it, it's a pin cushion jar filled with single use button shaped soaps for your guest bathroom, once the soaps are gone you can reuse the jar to store actual buttons. Any ideas on what to call it?

I took a circle of Cath Kidston fabric, sewed a basting stitch around the edge and stuffed it as full as I could with fibre fill, drew the ends of the stitch together and sewed shut. I added some decorative stitched and a button in the middle and hot glued it onto the cork lid, adding some ribbon on the edge to finish it off. I added some decorative pins, wound some bakers twine on a mini wooden spool and a pretty mini pastel safety pin to attach the tag.

The tag is stamped with Papertrey Ink's Button Boutique stamps, I loved that they included the washable word stamp because it fits in so nicely with the contents.


I purchased the soaps on Etsy and the most tedious part of the whole project was placing the soaps one at a time using a pair of tweezers so they all faced outwards.

By the time I was finished I didn't want to give it away (I eventually managed it!) but plan on making a few more as cute gifts!

Supplies used:
Stamps: Button Boutique - Papertrey Ink
Fabric - Cath Kidston
Soaps - The Charming Frog
Twine - Divine Twine
Ink - Memento Rich Cocoa
Ribbon - Maya Road
Lace, Pins, Wooden Spool, Buttons - Dainty Paperie*

*In interest of full disclosure, Dainty Paperie is my Etsy store.

Friday 2 September 2011

A Tall Order

I like to try different card sizes now and then, I usually like to use 5x7 or 5x5 and when reaching for a packet I came up with some DL cards. I don't usually use DL cards as they are a bit too long for my liking, I always end up with some negative space that doesn't quite flow.

I bought some 8x8 paper pads recently and found that quite a few of the sheets have designs that only cover one side of the paper and sometimes it can leave me a little lost! However, when paired with a DL size card I love how simple and elegant they can look, and with very little work!

This paper is from DCWV Garden Party stack, sentiment and label is from Papertrey Ink and the ribbon was in a bag of scraps. I was quite sad to give this one away as I'd grown quite attached to it!
This paper came from the DCWV Citrus Stack, as with the other card it has pretty much all the same elements, all bar the button. The one thing I like about these papers is the heavier weight cardstock and the thermographic glitter they use in the patterns, guaranteed no shed!

What card size do you usually use? Is there a cards size that you avoid and why?

Wednesday 31 August 2011

Re-run of an old favourite

Over the past few years I have created quite a number of cards, but I do have a handful of favourites and this is one of them.
I made this for my Mum's birthday. The card was created using a piece of Papermania acetate, I handcut a bracket shape from K&Co paper and attached on the inside. All that was left to do was to go to town decorating it! I added a dangling charm, which, if I had thought about it I should have made it detachable so it could have been used as a handbag charm!

I like to do commissions for family and friends and this is the most requested one. I thought that I would share a different version that I created recently.

In essence it's the same card with a small change to the embellishments.

Sometimes I have a little bit of a mental block when I am creating something in a short time frame and often find that it is helpful to refer back to previous cards that I have made and either make a direct copy or take some elements or the basic sketch and twist it slightly to make a new card. A good idea when you are in a pinch for an idea!

Is there a card that you have made that you like to remake? Do you use your own cards when feeling a bit low on mojo?

Monday 29 August 2011

Hello

I hope this bank holiday finds you all well? I have a few Crafty Templates creations to share today!
These two are from the pretty July kit which has unfortunately sold out! I just love the first one, so cute and easily adaptable for that special man in your life

'He' is quite easy to cut by hand and all materials used were from the kit apart from the woodgrain and silver tone paper which were from my stash.

I was a little bit daunted when I saw the 8x8 card blank as I have never worked with such a large size before but once I got going I liked the 'space' that it gave me. Here I used the balloon template which I duplicated 2 further times to create the bunch and adhered using different heights of foam pads and sewed the hearts to the page and 'fluffed' them out for more dimension.

These cards were made using the August kit from Crafty Templates called Sweet Summer which is currently still available and features gorgeous papers and embellishments.

This is made using the bottle template which is kawaii cute! I simply added some letter stickers and gems!
A cute little mushroom which would be great to use on a male card 'For A Funghi'!

I like this one so much, again it's a great base to use for a male card, bon voyage or replace the plane with birds or the balloons for any occasion!

Until next time when I have some exciting news to share :)

Friday 8 July 2011

A Teeny Toot!

A couple of months ago Leo at Crafty Templates sent the DT some fabulous ice cream templates to use as part of a project in conjunction with Papercraft Inspirations, and to my surprise my card is featured in the magazine! I was so excited, I've never had a card published before :)

Here is the card in the magazine


and here is the card!

I took the scoops and cut them from Bo Bunny double dot cardstock and highlighted the edges with chalks, I cut the cones from yellow cardstock and stamped in rich cocoa Memento ink with my Hero Arts Envelope Pattern stamp to add a grid texture. I layered this all up with foam pads and topped with a coordinating pearl. A nice summery but cool card! Thanks for letting me share :)

Tuesday 5 July 2011

Just a quick one..

I know, I said I was a bad blogger last month and it seems to continue :( Before I forget I just wanted to share the cards I made from the Crafty Templates Vintage Indie cardmaking kit and templates, if you pop over now you can still pick one up, a lovely mix of papers and embellishments for a fantastic price!
This one has to be my favourite, dress form? check. polka dots? check. I just love it!

This one didn't use the kit but did use the templates. I love anything owl related.

I would love to own a pair of fancy shoes like this!

Cute vintage radio.

I have got a couple of exciting things to share over the next few days, so I hope you'll come back soon :)


Thursday 9 June 2011

Crafty Templates - One for the Guys

I am a bad blogger! I completely forgot that I had not shown my Crafty Templates 'One for the Guys' cards that I made for May. Lots of lovely American Crafts Campy Trails and Cosmo Cricket Social Club, it is still in stock in the Crafty Templates store so I urge you to check it out :)


If you are looking for the 52 cards challenge you can now find it at the lovely and talented Nat's blog Kool Kitty Musings, please do drop on by!

Sunday 15 May 2011

52 Cards Challenge Announcement

Hello Friends!

Since starting the 52 cards challenge I have made some lovely new friends, seen some beautiful cards, boosted my own creativity and hopefully helped a couple of you increase yours.

It is with a heavy heart that I have decided I can no longer continue with the challenges. I could post the prompts every week, but I like to participate too and don't feel I can carry on without being fully 'invested'

Unfortunately other things in my life have taken over and I just don't have the time to continue. If you would like to take over please let me know and I can email you all the prompts so you can carry on.

I will still be posting here on my blog and look forward to creating more projects in the future.

Thank you for your continued reading and participation :)

Ang

Monday 9 May 2011

52 Cards Challenge Week 19

Hello. I hope this Monday finds you well? Here are the prompts for this week's challenge
Green, Embossing, Get Well

Here is my take on it
I covered the base in paper by October Afternoon, inked the edges with Spun Sugar Distress ink and sewed it onto the card base. I stamped the sentiment on the journalling card and glued it down, I then cut a circular shape using decorative scissors from Bo Bunny Paper and sewed this to the card base. I didn't have any matching embellishments so I created one using my scalloped and circle nesties. At this point I realised I hadn't used embossing! so I embossed the layers of the flower :)

Until next week x

Supplies used: Paper; Bo Bunny, October Afternoon. MME journalling card

Sunday 8 May 2011

Some more challenge cards

I had so much fun with the card I made for the challenge this week that I instituted a new rule, if I cut into a sheet of 12x12 I have to use the whole sheet up, so I did!

This one uses and old Stickeroos sticker I had, a piece of a doily from Basic Grey and some yummy lace and Maya Road pleated ribbon.
More of the same but this time I added a cute cabochon earring that I had from a set from Primark.

I purchased this photo frame the other day from The Range and thought it needed a little something extra
I added some handmade flowers, gems and some leaf ribbon. I lightly rubbed over the wood with some Gelatos to add some subtle colour, I just adore the way the 'shingles' came out. The insert is removeable so you can add your own photo (the glass is also kept within the frame) I love it!

Monday 2 May 2011

52 Cards Challenge Week 18

Happy monday to you and I hope you have been enjoying the extra days off work we've had recently :)

Here are the prompts for this week's challenge:

Yellow, Plastic and Gingham.

I did consider using yellow as my accent colour but after finding the perfect paper for it decided to theme it around the colour;
I used Crate Paper Emma's Shoppe Fabrics paper as the base and reversed it for the die cut label, Melissa Frances tiny tag and envelope, paper roses and a little acrylic flower as the 'plastic' element. This card turned out just how I wanted it to and I don't want to give it away :)

Supplies used: Crate Paper Emma's Shoppe Fabrics paper, Melissa Frances tiny tag and envelope, Recollections paper rose, American Crafts gingham ribbon, seam binding ribbon, lace, gingham card and gems.

I hope you have fun with this week's challenge :) Don't forget to leave a link to your's in the comments!

Tuesday 26 April 2011

And the winners are....

I have entered the numbers into the Random Number Generator with the adjudicator Mr Paper present :) and the winners are...
Suzie! You have won the main prize giveaway, congratulations!
Brenda! You have won the Martha Stewart punch, congratulations!
Nora! You have won the clear stamps, congratulations!

Winners, please email me cards @ paperandribbons . co . uk (remove the spaces) with your address. Thank you to all those that took part :)

Monday 25 April 2011

52 Cards Challenge Week 17

Apologies for the delay, birthday shenanigans took over! Here are the prompts for this week:

Red, Kraft and Tools.

I went with the tools prompt for my theme and used a miniature gardening trowel on a Father's Day card ready for my father-in-law.
I used the cute Cosmo Cricket Garden Variety paper and Papertrey Ink die and sentiment.

Have a great week!

Monday 18 April 2011

52 Cards Challenge Week 16

Good morning friends :) I am so excited as I type this, I am looking forward to a week and a half off starting from Thursday and I hope to get some quality crafting in during that time!

Onto the prompts for this week:
Tangerine, Yellow and Garden.

I decided to use some of my lovely new Hero Arts stamps and Gelatos for this week, here's mine;
I misted the stamp with water and rubbed over different colours of Gelatos and stamped on a textured card base, added some white twill and the sentiment.

Supplies used: Hero Arts CL431 Watercolour Petals stamp , Faber-Castell Gelatos, white twill, Papertrey Ink sentiment, Martha Stewart Classic butterfly punch.

Have a great week and remember there is still time to enter my prize draw which is open until 23:59 Monday 25th April and I will be drawing the winners on Tuesday April 26th! (my birthday - yay)

Monday 11 April 2011

52 Cards Challenge Week 15

Hello! I hope you are all continuing to enjoy the challenges. Remember, this is to help you create more, don't worry if you 'fall behind' you don't need to catch up, pick and choose the challenges as they suit you and your busy schedule. I must admit I have so many projects on at the moment, I have missed a couple of birthday's/anniversaries and I need to make some belated cards to apologise, I have my DT cards to finish and I have a few other projects on the go so I really had to use the prompts for this week to get it done!

The prompts this week are

Brights/Bling/Ribbon

Here is mine
I added some gems and sequins to the paper and a little bit of ribbon and it was finished, a nice quick easy card that looks nice qand sparkly in real life :)

Have a great week!

Supplies used: Cosmo Cricket Delovely Paper and Sentiment and Doodlebug Ribbon

Saturday 9 April 2011

Craft Stash Shopping in New York

I have been lucky enough to visit New York on a number of occasions and always find myself looking for good crafty places to visit before I go and I thought I would share some tips here.

Michaels
The good news is that you no longer have to travel to Staten Island to visit Michaels as there is now a location in the city which opened in 2009. Located at 808 Columbus Avenue, take the 1 subway to 103rd street, walk 2 blocks towards downtown and 2 blocks left and you will find yourself on Columbus. Alternatively you can take the 11 or 7 uptown bus. It looks small from the outside but the actual store is located in the basement and carries a good range of crafting materials. Don't forget to sign up and print the discount coupons before you go!

The Ink Pad
37 Seventh Avenue on the corner of 13th street. Take the 1, 2 or 3 Subway exiting at 14th street. The Ink Pad is one block south. What the store lacks in size more than makes up for in the number of stamps that they carry. Lots of wood mounted and acrylic stamps from over 100 different companies including Hero Arts, Unity and Ranger Industries. They also have a great range of ink pads (obviously!) crafting tools and magazines. The staff are very friendly and helpful and I would definitely recommend a visit.

Kate's Paperie
The website has excellent instructions on how to get to their 2 locations. It has the feel of an upmarket stationers but it does carry some cratfing materials such as stamps, embossing powders and ink pads.

The Garment District
You can take up many hours wandering around the garment district located roughly (to me) around 36th and 40th streets between 5th and 7th Avenue. There are so many bargains to be had but be careful to shop around, there are some stores that are priced much higher than others and the difference in price between 2 stores that are ocated next to each other can be surprising. Here are some of the places that I have been to:

M&J Trimmings
1008 6th Avenue West 38th Street. The store has a stunning array of ribbons and findings, however this was the priciest store I visited, I really wanted seam binding ribbon but decided to leave it at $1.98 a yard (I found it at $0.50 a yard a couple of streets over) Also be wary when buying white or cream ribbons as all of the ribbons I purchased had dirty marks and smudges on the outside, however I did pick up some beautiful teal velvet ribbon.

Joyce Trimmings
109 West 38th Street. Located just across the road from M&J Trimmings this happened to be my favourite trimmings store in the area. Beautiful ribbons, trims, cameos, flowers and cabochons all at great pocket friendly prices. I also loved the $3.95 mixed button bags containing approximately 300 buttons, whilst not all are suitable for crafting the ones that are were well worth the cost of the entire bag. They also have mixed packs with various off-cuts for bargain prices. I strongly recommend a visit.

Tinsel Trading
1 West 37th Street. A gorgeous looking store inside with a vast array of vintage ribbons, trims, flowers and home decor items. Expect to pay higher prices in here as a lot of items are stated as being vintage, an inspiring shop to visit, however I saved my pennies and looked at other stores for cheaper alternatives.

There are also lots and lots of bead shops in Garment District and it is hard to choose one specific store. They all seem to carry pretty much the same base selection of stock and as before the prices of particular items can vary from store to store. I went specifically looking for flower cabochons, and most of the bead stores sold them but they were $1.00 a piece, whereas you can buy a whole pack of prima brand ones for £2.99. I like to buy mine from eBay where there is a great selection for really good prices.

If you have any questions or any shops to add please do let me know! Happy shopping :)

Monday 4 April 2011

100th Post Prize Giveaway and 52 Cards Challenge Week 14

Hello! When I started this blog I did wonder if it would be a passing fad and I would lose interest but I love sharing what I make with family, friends and visitors and it has really helped me boost my creativity!

I am happy to celebrate my 100th post! and to celebrate I am pleased to have a blog candy giveaway filled with some of my favourite things and there are 3 prizes :)

Prize number one
Fiskars Threading Water Punch
Hero Arts Clear Design Everyday Sayings CL342
Hero Arts Clings Hearts Trio CG160
5 packs of Studio G clear stamps and stamping block
1 Studio G wooden stamp
6 bottles of Tim Holtz Distress Stickles
2 packs of American Crafts Gem set brads
4 Promarkers
1 Sizzix Sizzlet Flourish Die
1 pack of flat back multicoloured pearls
1 bottle of turquoise glitter glue
1 set of flower earrings (just remove the backs!)
1 peach cabochon bracelet (easily separated)

Prize number two
Martha Stewart Classic Butterfly trio punch

Prize number three
Inkadinkado Paperwork Greetings Clear Stamps 97614

All you need to do to enter is:

1 - Be signed up to follow my blog if you aren't already;
2 - Leave a comment on this post :)

Entries are open until 23:59pm GMT on Monday 25th April and I will draw the winner using a random number generator on my birthday Tuesday 26th of April.
Now, on to this week's card challenge. This week's prompts are:
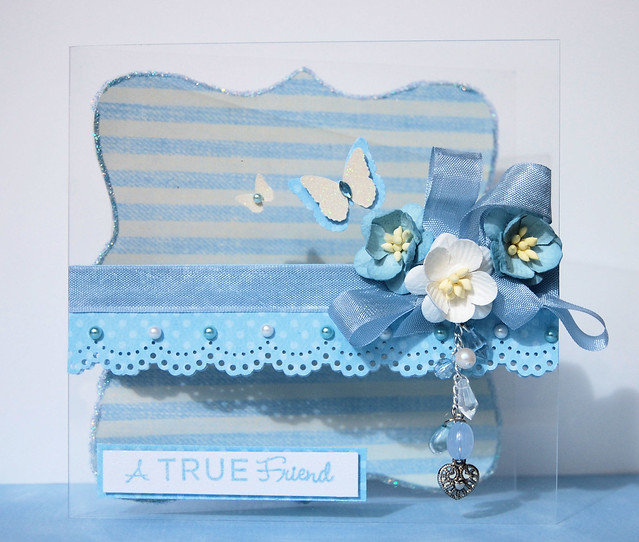
Blue, Stamping, Circles

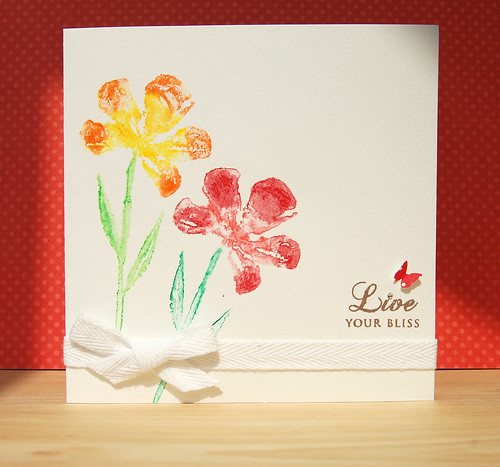
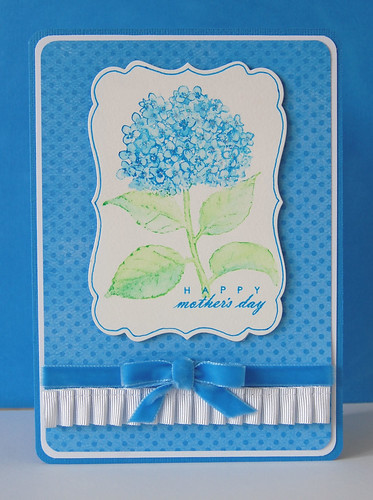
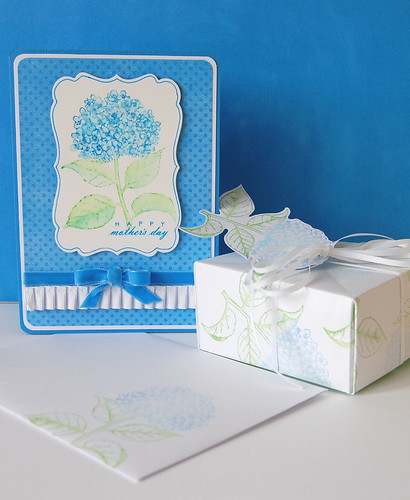
I needed to make my Mother's Day card and decided to use the prompts for this week. I wouldn't normally have gone with a blue colourway but I was really happy with how it turned out. I decided to use 2 out of the 3 prompts.
On a recent trip to the US I bought some Faber Castell Gelatos and they are just fab to work with. Solid sticks of colour in a lipstick style tube, you just lightly mist your stamp with water and run the gelatos over the stamp and stamp. They give a lovely watercolour look and you can stretch the colour out further using a water pen brush or add more colour by taking a damp brush directly to the gelato and painting on the stamp. I just love them!

I had bought my mum a necklace for Mother's Day but wasn't keen on the box so I made a matching gift box and tag to put it all in and finished off with stamping on the envelope. If you would like to make a gift box take a look at my easy tutorial here.
Supplies used: Hero Arts Botanical Etchings Hydrangea stamp, Papertrey Ink Sentiment, Faber-Castell Gelatos, Bo Bunny Double Dot cardstock, American Crafts Cardstock

Have a happy week and thank you so much for reading :)

PS - All of the challenges so far can now be found under the 52 Cards Challenge page under the header.

LinkWithin

Related Posts with Thumbnails